Blog 1- Ideas and Inspiration
To start the process of creating my song, I had to begin by looking for inspiration from a diversity of songs. I already knew what styles and genres of music that I wanted to pursue, based on my own musical tastes. The reason for choosing to base my song on my own musical preferences was so that it would enable me to be more creative as well as more unorthodox when coming to develop my song using Logic Pro X.
To begin formulating different ideas I began by listening to various songs and pieces of music in genres that I really enjoy. My fondness towards experimental music convinced me early on that I wanted to create something more unconventional than the music that you would typically tend to hear on the radio, or from the charts. Therefore, I was drawn to do a piece that was labelled as something more unique and innovative, and I particularly liked the idea of writing something either for film or TV.
When I realised, I wanted to create an experimental song I had to research what exactly it is that makes a song experimental by today’s standards. One of the definitions of experimental is often considered as ‘a work of art or artistic technique involving a new and radically innovative style’ (Soul, 2015), suggesting that experimental music revolves around unfamiliar and innovative ideas that do not conform to societal expectations (EssayUk, 2020). Ralph Waldo Emerson states, ‘Whoso would be a man must be a non-conformist’ – (Emerson, 1994) in other words we should use our uniqueness and individual minds to create things that are new and idiosyncratic. A promising up and coming band called Royal Blood is a strong example of music that can be considered as more creative, out of the ordinary and uses a more individualistic approach when creating their music. The two piece play an unusual combination of only bass, drums and vocals (Savage, 2014). The band achieves a full band sound by their use of heavy processing and FX from just drums and bass guitar. The prior definition of experimental music can also be inextricably linked to the piece ‘Water Walk’ (1960) by John Cage.
This song cleverly uses abundances of non-traditional instruments and sounds such as radios, water, bath sounds etc to create the sonic content of the piece (VocalMedia, 2017). This is an idea that I really liked and decided I wanted to incorporate this into my own piece in the future, perhaps with using different sounds.
Next Steps:
1. Write Lyrics
2. Create a Chord sequence
3. Get a good recording of Piano
4. Begin to create song in Logic
Reference list:
Emerson, R, W. (2010) Ralph Waldo Emerson’s Self Reliance: A modern-day interpretation of a self-help classic. New ed. Dover Publications Inc.
Essay UK. (2020) ‘Conforming Vs Not Conforming To Societys Expectations’. Available from: https://www.essay.uk.com/coursework/conforming-vs-not-conforming-to-societys-expectations.php [Accessed 21st December 2020].
John Cage. (2007). Water Walks – 1960 [Official Video]. [Online Video]. 2007. Available from: https://www.youtube.com/watch?v=6-v1b9waHWY. [Accessed: 27th December 2020].
Savage, M. (2014) ‘Royal Blood rewrite the rules of rock’. Available at: https://www.bbc.co.uk/news/entertainment-arts-28776636 [Accessed 23rd December 2020].
Soul, A. (2015) ‘EXPERIMENTAL: A WORK OF ART OR ARTISTIC TECHNIQUE INVOLVING A NEW AND RADICALLY INNOVATIVE STYLE‘. Available from: https://creativeartzcorner.wordpress.com/2015/12/31/experimental-a-work-of-art-or-artistic-technique-involving-a-new-and-radically-innovative-style/#:~:text=EXPERIMENTAL:%20A%20work%20of%20art%20or%20artistic,technique%20involving%20a%20new%20and%20radically%20innovative%20style [Accessed 21st December 2020].
VocalMedia (2017) ‘Does experimental music mean giving up ‘conventional’ music?’. Available at: https://vocal.media/beat/experimental [Accessed 27th December 2020].
BLOG 2 – Writing the Lyrics
Before creating a chord sequence, I wanted to initially get down the lyrics for my song. The reason I wanted to do this was because the lyrics would be able to highlight the route I wanted to take chorally when using either a minor or major key and instrumentally by helping me identify what sort of instrumentation I wanted to use. Labelled entirely as an instrumentalist and not being a vocalist in the slightest meant that writing the lyrics ended up being one of the harder jobs of developing my song. Fortunately, I am an avid poetry writer, and I had an idea to use my own poetry to form the basis around the lyrics to my song. Although using poetry to influence or write music isn’t an original idea and has actually been used throughout music for an extensive time, an example of this being Claude Debussy’s infamous masterpiece ‘Claire de Lune’ (Meaning moonlight) which was based off several poems from ‘Fetes Galante’s’ collection, written by Paul Verlaine (Byrnside, p529).
Below are a couple of poems written by myself that I used as inspiration for the final results of my lyrics.
- I don’t know what to say ii. My mind is torn, my heart is worn.
I’m lying here in the dark Lost in the cold dark space of my thoughts
Tears falling down my face Feeling as though my whole being is
Fear Knitting my Stomach Stretching out and wearing thin.
I fell in Love
Or so I thought My self is splitting apart from me,
But can I truly love another Shudding into a husk of who I am.
If I don’t even love myself? Focusing on my grip,
Trying to hold on to what is me,
I’m burning What make me,
Slowly Me.
Steadily By Joshua Smith
I’m Crumbling into a pile of ashes
The remnants of Broken dreams
And an unfulfilled life
Strewn across the fireplace
I scream
Yet nobody hears
And I cry
Yet nobody Sees
A one bright flame
Is spluttering out
Running out of oxygen
Finally succumbing
To this tortured world
Which has always seeked
To extinguish my flame
Still I’m lying here in the dark
By Joshua Smith
After basing the lyrics to my song on my poetry, which is very personal to me, it then ensured that I wanted this song to be as impactful as possible. Stolpe states that ‘Whether we are writing for ourselves or for someone else, the objective is always the same -to cause a significant experience in the mind and heart of our listener’ (Stolpe, 2007).
I then continued to develop my lyrics by creating a hook line in a chorus. It is widely accepted that a hook line (Most often over the melody of the chorus.) is often the most important and integral part of a song (Thomas, 2016), hence why I had to ensure that while conveying the same characteristics as a typical hook line, that it also still conveyed the experimental genre of music that I was aiming for. I liked the idea of using the word ‘Shadow’ in my chorus to symbolise an amalgamation of mental health difficulties such as depression, anxiety and shows that sometimes we might feel like a ‘shadow’ not being seen or heard by the world.
One of the pieces i listened to previously for inspiration for my lyrics was Radiohead’s song ‘Creep’ (1993).
One of the ideas that I took from this song was the use of the word ‘fucking’ in my piece of music to strengthen the message behind the lyrics I wrote, because it is not as common to hear a cuss word in a song.
After extracting, adapting changing, and creating lyrics to my song below was the end result to my draft lyrics and structure.
Verse 1
Love taught me to be broken
Life taught me I’m torn
I’m such a fucking loser
Chorus
I’m a shadow
I’m a shadow
In the dark
And no one sees me
(And/yet) No one hears me
Yet I’m still all alone in the dark
Verse two
My mind is torn
My heart is worn
I’m all Lost in the cold dark space of my thoughts
(And/maybe) That’s why
Chorus
I’m a shadow
I’m a shadow
In the dark
And no one sees me
(And/yet) No one hears me
Yet I’m still all alone in the dark
Bridge/linking line
In this world full of shadows there’s no one loving me
Verse 3
Free from torment,
free from pain,
free from all these voices that keep threatening each day.
Chorus
I’m a shadow
I’m a shadow
In the dark
And no one sees me
(And/yet) No one hears me
Yet I’m still all alone in the dark
As you can see above with the first draft lyrics, there is a lot of resemblance to my two poems. I extracted different lines, along with the chorus I made to create a narrative through the song for audiences to relate to.
Next Steps:
1. Create a Chord sequence
2. Get a good recording of Piano
3. Begin to create song in Logic
Reference List:
Byrnside, Ronald L. “Musical Impressionism: The Early History of the Term.” The Musical Quarterly, LXVI, no. 4, 1980, pp. 522–537.
Radiohead. (1993) ‘Creep‘ [Official video]. [Online video]. 2008. Available at: https://www.youtube.com/watch?v=XFkzRNyygfk [Accessed 6th January 2021].
Stolpe, A. (2007). Popular Lyric Writing: 10 Steps to Effective Storytelling. Nashville: Hal Leonard Corporation.
Thomas, K. (2016). ‘What is the Most Important Part of a Song?’. Available at: https://songwritingplanet.com/most-important-part-of-a-song/ [Accessed 4th January 2021].
BLOG 3 – Creation of Chords
Now after having a direction of where I want to take my song, it has now allowed me to go ahead and create my chords to go along to my lyrics. Having the basis around the idea of my song, and the message that I want to convey across in my music made it quite clear to me that the song leant itself towards a more minor chord set approach to match the emulated message reflected in my song. It is often in songwriting that we tend to use chords to evoke the desired emotion that we want to channel. However, it is still not uncommon to use major chords in a song that still gives off a melancholy atmosphere, for example in Hank Williams’ country classic (1949) ‘I’m So Lonesome I Could Cry.’ Surprisingly, this song includes no minor chords, and is instead given the mournful atmosphere by the choice of notes and the creation of the melodic line (Blume, 2016).
Usually, I tend to start the foundation of my songwriting by using only a few selected chords to match the lyrics, and then further develop them later when adding other instrumentation to the song. David and Heartwood describe this process perfectly:
‘Writing a song is very much like fitting pieces of a puzzle together: once you get going with an idea, it’s a matter of laying your pieces out on the table and then getting them to fit’ (Davidson and Heartwood, n.d., p. 4).
Initially when writing the chords to fit the lyrics there were only four chords for the whole piece, these being A, Am, D and Dm7. I wanted these chords to form the foundation for the instrumental to my piece. When in the process of developing my chords I still was not quite settled in the direction I wanted to take the piano part. At first there was a lot more movement in the piano part, however I changed this and went for a more minimalistic approach so that it left room for adding in other midi instruments and audio files, as was needed to hit the criteria for this project. This also allowed me to play the chords in the piano in the right hand while still enabling me to create a slow walking bass in octaves in the left hand of the piano as shown below.

Next Steps:
1. Get a good recording of piano
2. Get a good recording of Vocals
3. Begin to create develop song further in Logic Pro X
Reference List:
Blume, J. (2016) ‘5 Tips for a Happy Marriage of Music & Lyrics’. Available at: https://www.bmi.com/news/entry/5_tips_for_a_happy_marriage_of_music_lyrics1 [Accessed 3rd February 2021]
Davidson and Heartwood. (n.d.). ‘Songwriting for Beginners: An Easy Beginning Method.’ USA: Alfred Music.
Hank Williams. (1949) ‘I’m so lonesome I could cry‘.[Official video]. [Online video]. 2009. Available at: https://www.youtube.com/watch?v=4WXYjm74WFI[Accessed 2nd February 2021].
BLOG 4 – Recording of Piano and Vocals
Before going on to further evolve my piece in Logic, I first decided that I wanted a good clean recording of the piano part. This is to act as a basis to then record the vocals on top of; then in further continuation to apply other audio samples and midi instruments using Logic Pro X. Regardless of the technological amelioration in recording equipment, the microphone remains an incredibly principal role in a recording studio. Using the correct microphone positioning is considered ‘one of the most important ways to enhance recognition accuracy. Even slight variations can deteriorate accuracy significantly’ (nn, n.d). I hoped that previous helpful lectures on microphone placement on top of my own research on the necessity of microphone placement would make certain that I got a good recording of both the audio for piano, and vocals. Some of the reasons microphone placement is so important are: (Rogers, 2020)
- Around half of the overall sound in a recording comes from the source
- There is around 20% of sound from surrounding environments that contribute to audio (Also known as spillage)
- Positioning of the microphone is paramount to the impact of noises from surroundings
- The position of a microphone also encapsulates the quality of voice from the source that will go into the recording
- The selection of what type of microphone you use to record will also have an impression in the overall input of sound
Through research I came up with several ideas to help with the preparation of recording my vocals to get the best possible re-enactment of sound possible. One of these ideas, found through personal research, was the idea of recording the piano, while capturing reflections from the hood of the piano. I planned to set this up by first opening the lid of the piano, and then by setting up a cardioid AK6214 microphone with a shock-mount. I decided to use the shock-mount so that when recording I would not pick up any of the vibrations coming from the piano onto the microphone set-up to ensure that I could get the cleanest recording possible

I decided to use the cardioid AK6214 microphone because I felt as though its unidirectional polar pattern was the best option for recording a singular sound source, especially when recording the piano. A cardioid microphone is also extremely good for sound isolation when recording, which is helpful when trying to get the cleanest recording possible with as little as possible spillage from surrounding environmental factors. In addition to all this, the cardioid microphone also becomes increasingly directional as the sound frequency increases, and yet less directional with the lower the frequency input (BecomeSingers, 2020). This makes it especially useful when recording my piano because the piano spans across many frequencies, starting from 27.5Hz (Which is towards the start of the average human hearing range) going up to a frequency of 4186.01Hz (n.n, 2013).
The recording of my piano was to enact as a template to then record the vocals on top. I planned to record the vocals in pretty much a very similar manner to the way that I recorded the piano with just a few adjustments. Like the piano I decided to use the cardioid microphone because of the advantages that I have previously listed. Furthermore, one of the adjustments I made was to add a pop filter on top of the microphone to further reduce the input of sound entering the recording from environmental surroundings.
Overall, I was more than pleased with the end results of my recordings. I managed to get a dynamic, clean recording of the piano, as well as an incredibly good recording of the vocals, and its harmonies. These recordings gave me a great basis to now experiment and continue to develop my piece using Logic Pro X tools.
Next Steps:
1. Choosing Midi Instrumentation, and audio samples to accompany my Live recordings
2. To continue to develop song using Logic Pro X tools
3. Automation, Mastering and finishing touches
Reference List:
BecomeSingers. (2020) ‘What is a cardioid Microphone’. Available at: What Is A Cardioid Microphone? – BecomeSingers.Com [Accessed 3rd February 2021].
nn. (2013) ‘Why is the highest frequency on a piano 4186 Hertz?. Available at: theory – Why is the highest frequency on a piano 4186 Hertz? – Music: Practice & Theory Stack Exchange [Accessed 3rd February 2021]
nn. (n.d) ‘Microphone placement’. Available at: Microphone placement (nuance.com) [Accessed 2nd February 2021].
Mishra, A. (2014) ‘Cardioid Microphone slide’. Available at: Microphone (slideshare.net) [Accessed 3rd February 2021]
Rogers, K. (2020) ‘Guide on the Proper Microphone Distance from the Mouth’. Available at: Guide on the Proper Microphone Distance from the Mouth – Bunny Studio [Accessed 2nd February 2021]
BLOG 5 – Midi Instrumentation choices, & Musical texture
Since finishing and getting a good recording of both piano and vocals, my aim now is to build upon my track by adding midi software instrumentation. The reason why I decided to go this way around recording my track, was because free midi software instruments are foreknown for not sounding the best (MaxB, 2016). I also wanted to have a good foundation from my live recordings to expand upon through my experimental uses in Logic Pro X.
Prefatory I wanted to create an experimental Logic based project, away from the social norms of current music. I am aware that so far in my project, there are little to no experimental pursuits shown so far. My aim is to change this by becoming a lot more exploratory in the choosing of my instrumentation. To begin with, I began by listening to many different logic pro sounds and instruments to get a base idea of what I could edit well and use in my project. Below you will see a labelled finalised version of my Logic Pro project including all the instrumentation and audio’s that I decided to use.
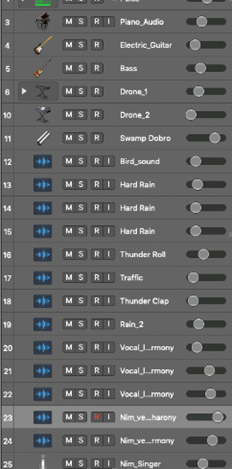
As seen above in my instrumentation and audio choices, the majority of my tracks were audio, rather than midi instruments. The reason why I did this was because in my journey to try to create an experimental piece of music I needed to do things out of the ordinary and create unpredictability (often used in John Cage’s music) to class my project as ‘experimental’(Cope, 1997). I tended to use what would be more describe as ambient sound audio effects, such as rain, thunder, traffic, birds etc. in the background of my music to create this unpredictability I was aiming for in my song. I partnered these ambient effects with the use of a selection of Drones that I created on midi instruments. These drones worked well with the ambient effects to add more depth to the polyphonic, homo-rhythmic and homophonic textures I have embedded within my song (MusicalTheoryAcadamy, n.d). Below you will find a screenshot of my logic project showing these different musical textures that I created harmoniously to create the desired experimental effect I was intending for.

As you can tell from the groupings of each track, you can see the layered textured effect that I was trying to experiment with to create an unexpected outcome for the listener when hearing my piece.
Next Steps:
1. Continue to develop song using Logic Pro X tools
2. Automation, Mastering, housekeeping and finishing touches
Reference List:
Cope, David (1997). Techniques of the Contemporary Composer. New York, New York: Schirmer Books.
MaxB. (2016). ‘Why software-synthesized MIDI music sound so bad?’. Available at: Why does software-synthesized MIDI music sound so bad? – Music: Practice HYPERLINK “https://music.stackexchange.com/questions/32617/why-does-software-synthesized-midi-music-sound-so-bad”& HYPERLINK “https://music.stackexchange.com/questions/32617/why-does-software-synthesized-midi-music-sound-so-bad” Theory Stack Exchange [Accessed 1st February 2021].
MusicalTheoryAcadamy. (n.d). ‘Musical Texture’. Available at: Musical Texture – learn about different music textures (musictheoryacademy.com) [Accessed on 3rd February 2021].
BLOG 6 – Continuation of editing and development using Logic Pro X tools/plug-ins
After creating the actual lyrical and instrumental content of my project, I was then left with the venture of editing both audio and midi tracks to make my piece of music sound coherent. In order to do this, I began by experimenting with different effects applied to both the audio and midi tracks. Below there will be two images capturing my digital audio workstation (daw) effects segment.

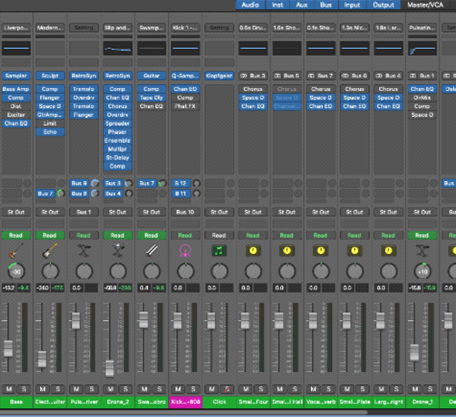
At a first glance it may seem like I have not kept up to date on the housekeeping part of my project and some of the buses may look peculiar to an avid Logic Pro user, however, the majority of these strange decisions I did purposefully. Some of the reasoning’s for these decisions (like only busing one part of a vocal harmony to a reverb) was because I wanted all the instrumentation and audio tracks to sound different from each other. Admittedly to improve, I could have possibly tried to have tidied my workstation better, and this is something I must work and expand upon in future projects.
One of the instruments I chose to use on Logic Pro X was the use of a kick drum, however I used this in a typically unconventional way to normal by editing it using Step sequencer. I used this to get it to the rhythm of a heartbeat for much needed movement in my piece. I also then continued to add an EQ to add some of the bass end on and to take off some of the top end, this was to get the heartbeat effect I was trying to replicate in my piece. Before my own research I had never heard of a step sequencer function in Logic Pro X before or what a step sequencer is used for. I found out upon research that a step sequencer is an ‘integral part of the world of electronic music, from the chugging modular Moogs of Tangerine Dream in the 1970s, through to the squelchy TB-303 sequencer lines that are still popular today’ (MusicTech.net, 2018). A step sequencer is also used a lot in the editing process for keyboards in Logic Pro, this was because it is a typical characteristic used in electronic music, however in my case I used the Step sequencer on the kick drum to create the desired effect I was looking for.
In terms of the instrumentation, I tried to prioritise on making sure that everything was placed and sounded tight within my piece. In this case, I had to focus on adjusting the lengths and duration of some of my drone notes, bass notes and other instrumentation to fit in with my live recorded audio tracks. This proved to be rather difficult because of the process I went about when first recording my live audio. When it came to recording the piano and vocals, I did not use a metronome to keep in time, so my playing was filled with a lot of rubato which made it almost impossible to fit the midi instruments in with the live audio tracks. Coughlin (2009) states that using a metronome when recording is good practice and allows yourself to become a better performer in the process of doing so (Coughlin, 2009). However, I continued to work and develop my piece and found solutions around the issues that I was facing; one for example being why a lot of the original piano audio was taken out of the recording, just to ensure that I could adjust all my instrumentation and audio files to make it sound all together as a whole piece of music. In the future when having to record something using Logic Pro again, I have now learnt that in order to make things easier in the future that I should in fact record my live instrumentation along with a metronome to clip everything into the right tempo. Luckily, I am happy that I managed to resolve these issues, partially since what I did managed to come under the umbrella of the experimental atmosphere that I was trying to recreate.
Reference List:
Coughlin, K. (2009). ‘metronomebot’. Available at: Why Use a Metronome? – Advantages and Benefits (metronomebot.com) [Accessed 2nd February 2021].
MusicTech.net. (2018). ‘Step-time Sequencing in Logic Pro X’. Available at: Step-time Sequencing in Logic Pro X – Enhance your electronic backbone (musictech.net) [Accessed on 2nd February 2021].
BLOG 7 – Finishing touches: Automation, Mastering, housekeeping
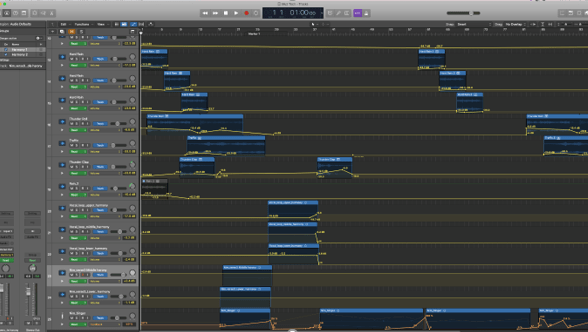
Automation is described by Logic Pro as ‘your key to mixes that adapt dynamically over time’. I ended up applying a lot of automations on my project to help give a shape to the dynamics across my tracks. This helped my piece sound more complete, rather than random sections entering and being on a completely different dynamic lever when compared to the rest of the track. On top of using the volume automation like most people tend to use, I also added a feedback automation and a wet automation. I decided to use these primarily on the lead vocals when entering different segments of the song, I used these as an effect to transition nicely throughout the piece.
Also, in the finishing stages of my project, I also decided to add a limiter. Using the limiter enabled me to essentially get my piece of music to the loudest possible level without clipping and disrupting the sound. Bregitzer states that (2009, p.195) ‘Digital limiters give recordings their perceived loudness’. This meaning that the limiter is an essential part to mastering a Logic file by getting the most sound from my project.
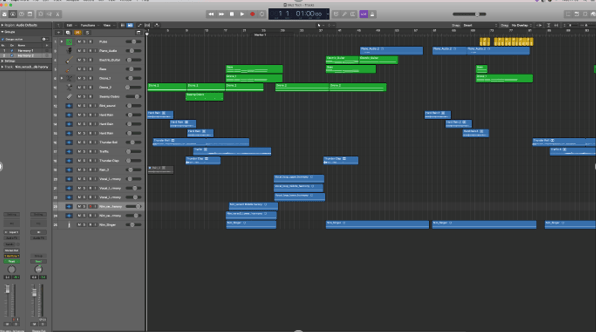
With the final touches I also went ahead and decided to do some housekeeping of my project so that it looked as professional as possible. This consisted of; grouping harmonies together; hiding tracks I ended up not using; deleting audio and midi instruments I ended up not using; placing the tracks in a logical order and naming my track segments to their named tracks.
Overall, I am extremely pleased with how my track developed as well as the growth in my understanding of Logic Pro X. Before this project, I was unable to use any digital audio workstations whatsoever, however this module has been incredibly useful by allowing me to experiment with the software and create a piece of music that I am happy with. In this blog I have tried to document a detailed overview of some of the processes that I used to develop my project.
Reference List:
Bregitzer, L. (2009). Secrets of Recording: Professional Tips, Tools & Techniques. Oxford: Taylor & Francis.
Why Logic Pro Rules. (2018). Available at: Logic Pro X Automation: Your Secret Weapon For Mixes That Move (whylogicprorules.com) [Accessed 4th February 2021].
Get new content delivered directly to your inbox.
